
In a previous article, I walked through the design decisions that matter when deploying a Supervisor in VMware Cloud Foundation 9. That article focused heavily on the planning that has to happen before the deployment wizard is ever opened, especially around VPC networking, NSX design, external IP blocks, workload reachability, and how those decisions affect VCF Automation.
If you have not read that article yet, I recommend starting there first:
Deploying a Supervisor in VCF 9: What Actually Matters
This article picks up from that point.
The assumption here is that the Supervisor is already running, the networking model was selected intentionally, and the environment is ready to move from platform enablement into real workload validation.
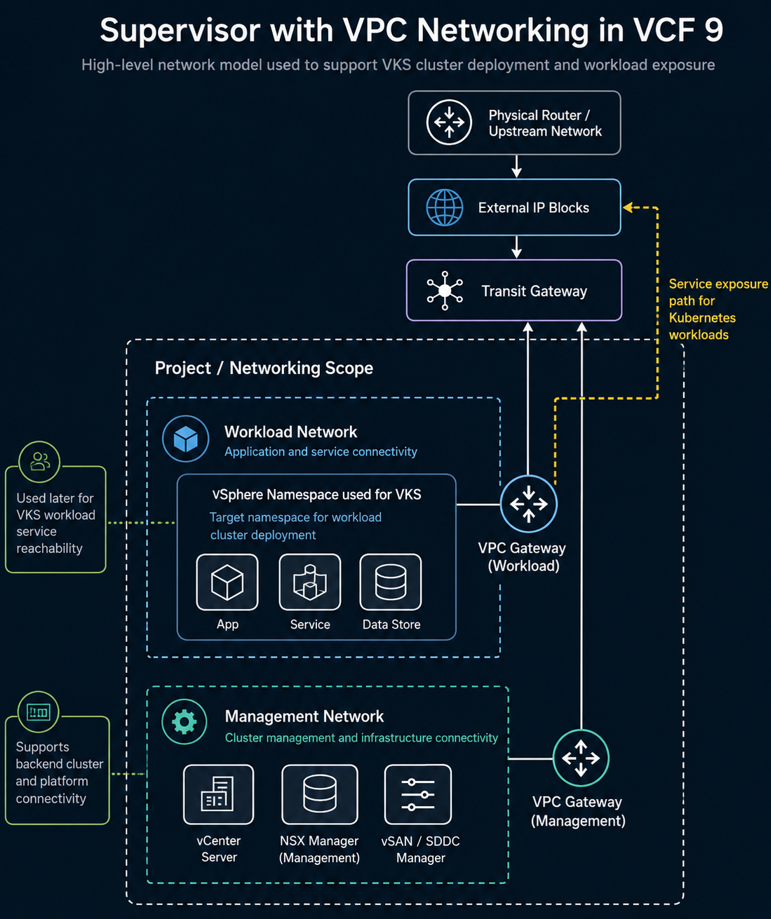
In this field example, the Supervisor was deployed using VCF Networking with VPC because the long-term goal was to support the All Apps organization model in VCF Automation. That decision mattered because the environment needed to align with the All Apps consumption model, while the hands-on VKS cluster and workload validation were performed through the kubectl workflow against the target vSphere Namespace used for the VKS cluster. The networking behind that platform still needed to support application exposure through the external IP block design.
Once the Supervisor was running, the next objective was to validate VMware vSphere Kubernetes Service, or VKS, in an air-gapped environment. That meant standing up a VKS workload cluster, enabling it to pull container images from an internal Harbor registry, resolving certificate trust issues, deploying a test application, exposing it through a Kubernetes Service, and confirming that the application could be reached through the expected network path.
The test application used for this validation was Vaultwarden. Vaultwarden was not the point of the exercise by itself. It was simply a practical containerized workload that allowed us to prove that the VKS platform could pull an image from Harbor, create a pod, start a container, expose the application, and make it reachable through Kubernetes networking.
By the end of this process, the environment was no longer just a working Supervisor deployment. It was a functioning VKS workload platform that could deploy applications from an internal Harbor registry in a disconnected environment.
All screenshots used in this article should be sanitized to remove environment specific identifiers while preserving functionality and workflow.
Starting Point: A Working Supervisor with VPC Networking #
The first major milestone was getting the Supervisor deployed correctly.
That mattered because VKS depends on the Supervisor as the platform foundation. The Supervisor introduces the Kubernetes control plane integration into vSphere, allows vSphere Namespaces to be created, and provides the platform layer that VKS workload clusters consume.
In this environment, the Supervisor was deployed with VPC networking because the goal was not only to enable Kubernetes, but to align the environment with the All Apps consumption model in VCF Automation.
That distinction matters.
VCF Automation can support different consumption patterns, but All Apps is the model that better aligns with modern application delivery. It expects the underlying networking to support application-centric consumption, namespace-based deployment, and external service exposure. VPC networking is the model that keeps the environment aligned to that path.
At a practical level, this meant the Supervisor phase had already addressed several critical design items:
- Workload domain placement
- NSX backing
- VPC networking selection
- External IP block planning
- Namespace reachability
- Backend workload networking
- External service exposure path
- Alignment with the All Apps organization in VCF Automation
That foundation became important later when the Vaultwarden test deployment was exposed through a Kubernetes Service and reached through the network path tied to the external IP block design.
Why Air-Gapped VKS Changes the Deployment Model #
In an internet-connected Kubernetes environment, deploying a workload can be simple. You reference an image from a public registry, apply the YAML, and the nodes pull the image directly from the internet.
That model does not work in many government, defense, and regulated enterprise environments.
In an air-gapped or disconnected environment, the workload cluster typically cannot reach public registries. That means all container images must come from an internal source.
At a minimum, this creates several requirements:
- An internal container registry must exist.
- Required container images must be staged into that registry.
- The registry must present a certificate that aligns to the environment trust model.
- The VKS workload nodes must trust the CA that signed the registry certificate.
- If the registry requires authentication, the workload namespace must include an image pull secret.
- The application deployment YAML must reference the correct internal image path.
- A Kubernetes Service must expose the application so it can be reached through the intended network path.
The difficult part is usually not the application YAML. The difficult part is getting the registry, certificate trust, workload cluster, namespace, and network path to all line up.
That was the core of this effort.
The Air-Gapped Harbor Bootstrap Problem #
One of the best references for this workflow is the VMware Cloud Foundation blog post on deploying Harbor in an air-gapped VCF 9 environment:
Deploying Harbor Service in Air-Gapped VMware Cloud Foundation 9.0
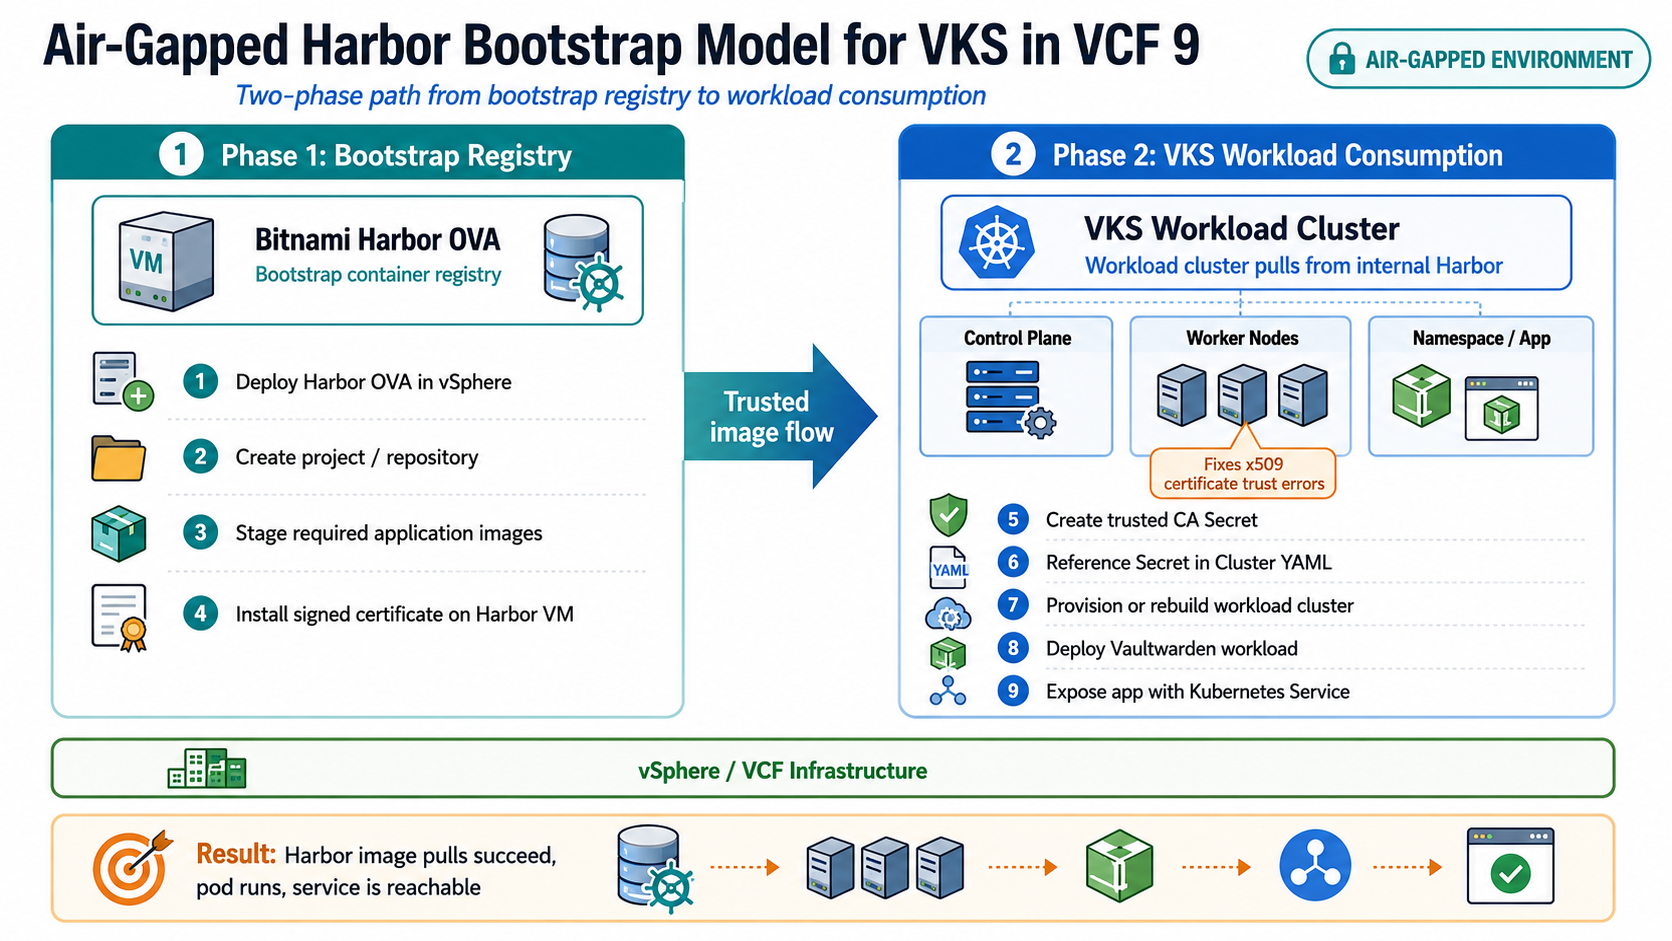
The article explains the bootstrap problem clearly. Harbor is needed as a container registry for air-gapped environments, but Harbor-related services and images also need a registry path during deployment.
The approach is a two-phase model:
- Deploy a Bitnami Harbor OVA as a bootstrap registry.
- Use that bootstrap registry to support Harbor Supervisor Service deployment or other air-gapped image workflows.
The Bitnami Harbor VM provides a practical starting point because it can be deployed as an OVA into the disconnected vSphere environment. Once it is running, container images can be pushed into it and consumed by Supervisor Services or VKS workload clusters.
For this validation, the immediate goal was practical:
Deploy Harbor internally, stage the Vaultwarden image, configure certificate trust, and prove that a VKS workload cluster could pull from Harbor and run the application.
Getting Access to the Bitnami Harbor OVA #
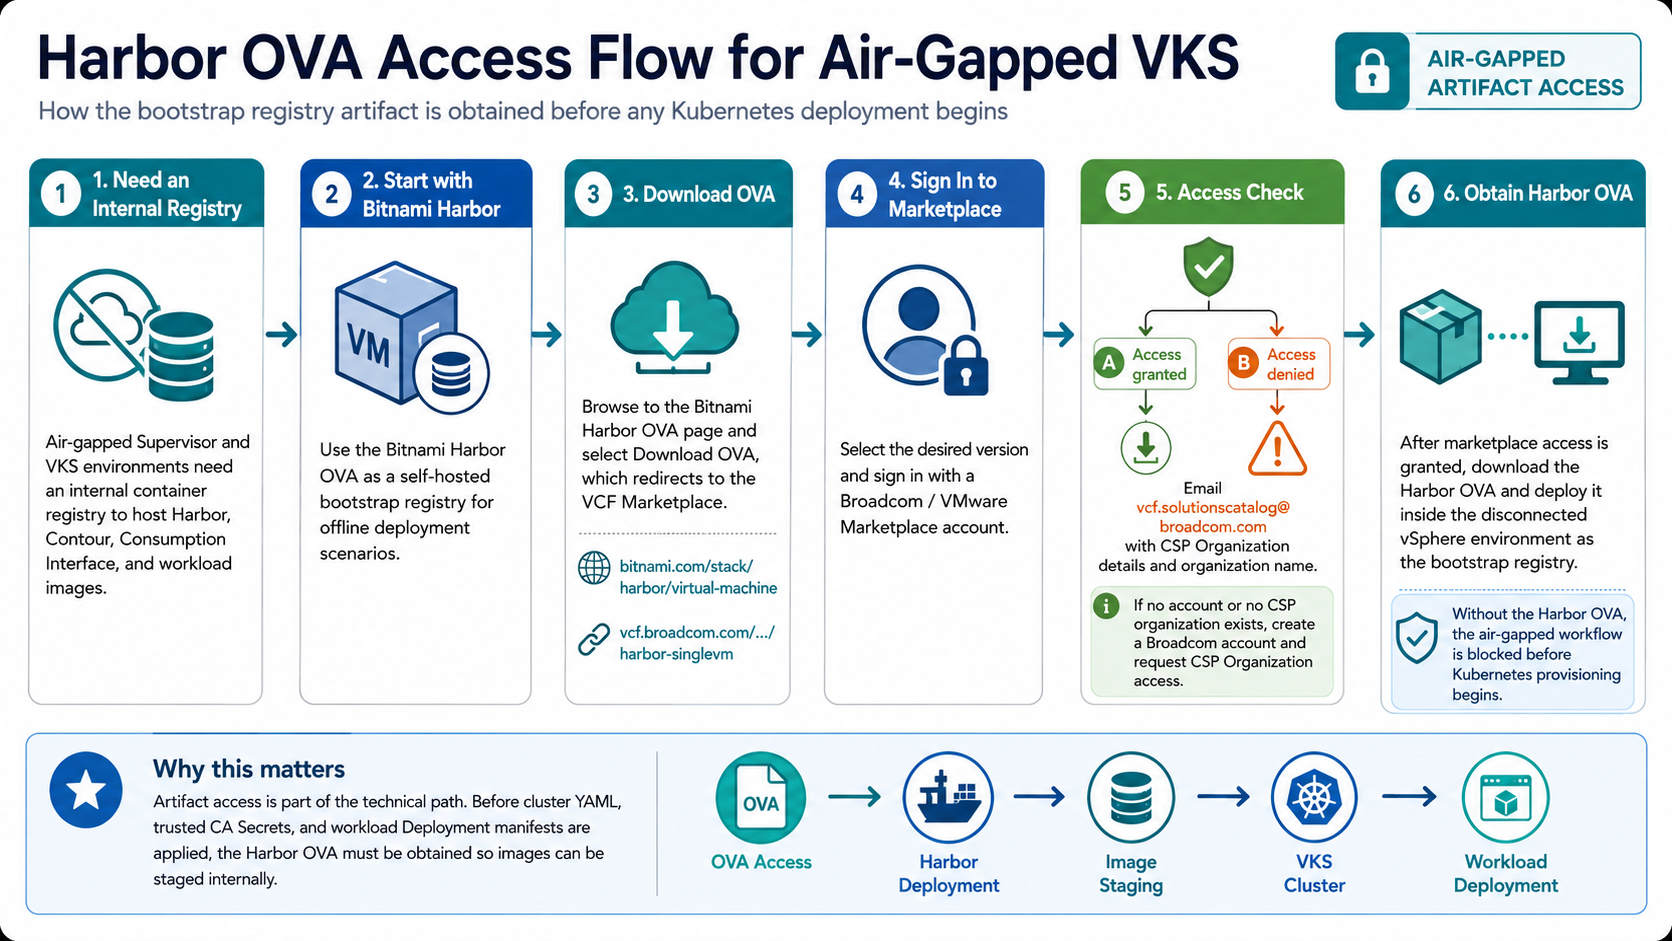
Before Harbor could be deployed, the customer needed access to the Bitnami Harbor OVA.
This was an important operational step because Bitnami virtual machine images are no longer freely available through the VMware Marketplace for individual users. Access is limited to VMware customers through the appropriate Broadcom or VCF Marketplace path.
The supporting Broadcom KB is here:
Accessing Bitnami Harbor OVA for Air-Gapped vSphere Supervisor Deployment
That KB explains that for air-gapped vSphere Supervisor deployments, a container registry is required to host Supervisor Services components such as Harbor, Contour, and the Consumption Interface. It also states that Bitnami Harbor provides a self-hosted registry option that can be deployed as an OVA in offline scenarios.
The download process was not as simple as clicking a link. The customer could see the download information, but access to the actual OVA failed during sign-in with marketplace-related access errors.
That required working through the Marketplace and CSP organization access path. In this case, the customer environment had several similarly named organizations that could have been associated with other deployments or teams. Rather than reuse an organization and risk impacting another environment, the decision was made to request a dedicated organization aligned to the specific deployment.
This is worth calling out because in disconnected environments, artifact access is part of the technical path. If the Harbor OVA cannot be obtained, the entire workflow is blocked before Kubernetes is even involved.
Deploying Harbor as the Internal Registry #
Once the Harbor OVA was available, the next step was to deploy it into the vSphere environment as an internal registry.
At a high level, the process looked like this:
- Deploy the Bitnami Harbor OVA into vCenter.
- Power on the Harbor VM and complete the initial bootstrap.
- Confirm the Harbor FQDN and IP address.
- Log into the Harbor UI.
- Create the required project or repository path.
- Push or stage the workload image into Harbor.
- Confirm the VKS workload cluster can resolve and reach the Harbor endpoint.
- Ensure Harbor presents a certificate aligned to the environment trust requirements.
The internal image path followed this general structure:
harbor.example.local/library/vaultwarden/server:1.36.0For public documentation, always sanitize the real registry FQDN, project names, namespace values, IP addresses, and node names.
At this point, Harbor existed, the image existed, and the application YAML had an image path to reference.
However, this did not mean Kubernetes could successfully pull the image yet.
The next issue was certificate trust.
The First Major Failure: x509 Unknown Authority #
The first deployment attempt failed during image pull. The error was the classic private registry trust issue:
x509: certificate signed by unknown authorityThis error tells you where the problem is occurring.
The failure was not that the Deployment YAML was completely wrong. It was not that the image did not exist. It was not that VKS itself was broken.
The failure occurred when the VKS worker node attempted to pull the image from Harbor and could not validate the certificate chain presented by the registry.
The key lesson is this:
Installing or signing a certificate on the Harbor VM is only one side of the trust relationship. The VKS worker nodes are the clients pulling the image, so those nodes must also trust the CA that signed Harbor’s certificate.
The flow looked like this:
Harbor presents a certificate
        ↓
VKS worker node attempts image pull
        ↓
Container runtime validates Harbor certificate chain
        ↓
If the signing CA is not trusted, image pull fails with x509
That led to the next part of the workflow: creating an additional trusted CA configuration for the VKS workload cluster.

Initial image pull failure showing the x509: certificate signed by unknown authority error when the VKS worker node attempted to pull the Vaultwarden image from the internal Harbor registry.
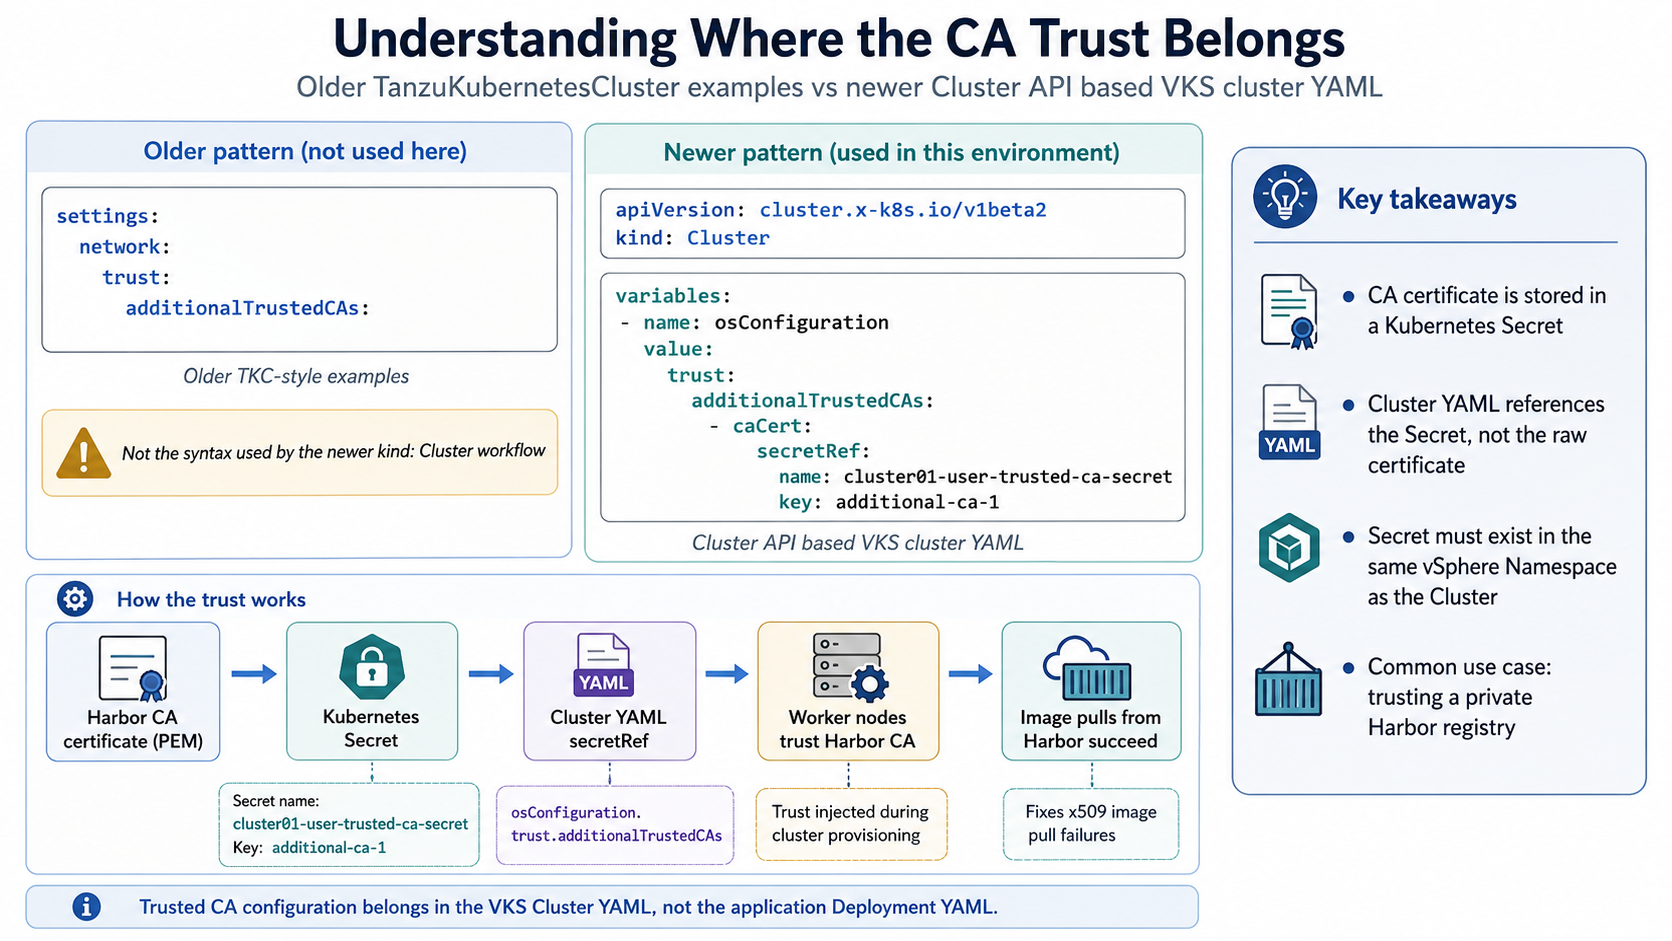
Understanding Where the CA Trust Belongs #
One point that created confusion during troubleshooting was the difference between older TanzuKubernetesCluster examples and the newer Cluster API based VKS cluster YAML.
Some older examples show the trusted CA configuration under a path like this:
settings:
  network:
    trust:
      additionalTrustedCAs:
That is not the format used by the newer kind: Cluster object.
In this environment, the workload cluster was using the newer Cluster API style:
apiVersion: cluster.x-k8s.io/v1beta2
kind: Cluster
For this model, the additional CA trust was handled through cluster variables, specifically under osConfiguration.trust.additionalTrustedCAs.
The working pattern looked like this:
variables:
- name: osConfiguration
  value:
    trust:
      additionalTrustedCAs:
      - caCert:
          secretRef:
            name: cluster01-user-trusted-ca-secret
            key: additional-ca-1
The key concept is that the CA value was not pasted directly into the Cluster YAML. Instead, the Cluster YAML referenced a Kubernetes Secret that contained the CA data.
That Secret had to exist in the same namespace where the workload cluster object was being created.
Broadcom documents this exact pattern in the VCF 9 example for adding additional trusted CA certificates to a v1beta1 or v1beta2 Cluster specification:
v1beta1/v1beta2 Example: Cluster with Additional Trusted CA Certificates for SSL/TLS
That reference became important because it confirmed several details that matched what we were seeing in the field:
- the newer Cluster API uses a
trustvariable for additional trusted CA certificates - the CA certificate is stored in a Kubernetes Secret rather than pasted directly into the Cluster YAML
- the Secret must exist in the same vSphere Namespace as the Cluster
- the Secret name follows the
CLUSTER-NAME-user-trusted-ca-secretpattern - the Secret data map key is user-defined, such as
additional-ca-1 - the certificate value in the Secret must be the PEM certificate content double base64-encoded
- the most common use case is trusting a private container registry
This is exactly the issue we were solving with Harbor. The workload cluster needed to trust the CA that signed the Harbor registry certificate before the worker nodes could pull images successfully.
Official VKS Cluster YAML References #
The official VCF 9 documentation is useful here because it reinforces the order of operations and the syntax model being used.
Broadcom documents the declarative VKS cluster provisioning workflow here:
Workflow for Provisioning VKS Clusters Using kubectl
That workflow is important because it shows that the VKS cluster itself is provisioned first from a cluster specification YAML. After the VKS cluster exists and the nodes are ready, application workloads are deployed into that workload cluster with their own Kubernetes manifests.
The general order is:
Log in to the Supervisor
        ↓
Switch to the target vSphere Namespace
        ↓
Validate VM classes, storage classes, and Kubernetes releases
        ↓
Craft the VKS Cluster YAML
        ↓
Apply the VKS Cluster YAML
        ↓
Wait for the workload cluster nodes to become ready
        ↓
Switch context to the VKS workload cluster
        ↓
Apply application workload YAML
The default kind: Cluster example is also worth reviewing:
v1beta1/v1beta2 Example: Default Cluster
That example matters because it shows the newer Cluster API syntax, including:
apiVersion: cluster.x-k8s.io/v1beta2kind: Clusterspec.clusterNetworkspec.topology.classRefspec.topology.controlPlanespec.topology.workers.machineDeploymentsspec.topology.variables
A simplified version of that structure looks like this:
apiVersion: cluster.x-k8s.io/v1beta2
kind: Cluster
metadata:
  name: cluster-default
  namespace: cluster-ns
spec:
  clusterNetwork:
    services:
      cidrBlocks: ["10.96.0.0/12"]
    pods:
      cidrBlocks: ["192.168.0.0/16"]
    serviceDomain: "cluster.local"
  topology:
    classRef:
      name: builtin-generic-v3.5.0
      namespace: vmware-system-vks-public
    version: v1.31.4---vmware.1-fips-vkr.3
    controlPlane:
      replicas: 3
    workers:
      machineDeployments:
      - class: node-pool
        name: node-pool-1
        replicas: 3
    variables:
    - name: vmClass
      value: guaranteed-medium
    - name: bootstrapAddons
      value:
        cniRef:
          name: antrea
          namespace: vmware-system-vks-public
    - name: storageClass
      value: storage-policy
The important distinction is that this is not an application Deployment manifest.
This YAML creates the VKS workload cluster itself. It defines the cluster networking, ClusterClass, Kubernetes version, control plane node count, worker node pools, VM class, storage class, CNI, and any additional ClusterClass variables needed to customize the cluster.
That is why the Harbor CA trust configuration belonged in this Cluster YAML. The trust configuration needed to be applied to the nodes as part of cluster provisioning. The Vaultwarden Deployment YAML came later, after the workload cluster was available and able to pull images from Harbor.
In this workflow, the sequence was:
Cluster YAML = builds the VKS workload cluster and injects node-level trust
Deployment YAML = deploys the application workload after the cluster is ready
Service YAML = exposes the running application over the network
That distinction is easy to miss, but it is one of the most important parts of the workflow.
Creating the Trusted CA Secret #
The next step was to create a trusted CA Secret that the VKS Cluster YAML could reference during workload cluster provisioning. This process involved taking the Harbor CA certificate, encoding it correctly, placing it into a Kubernetes Secret, and referencing that Secret from the VKS Cluster YAML.
This workflow aligned with Broadcom’s VCF 9 trusted CA example for the newer Cluster API model. That documentation specifically states that the Cluster API provides a trust variable for provisioning a cluster with one or more additional trusted CA certificates, and that double base64 encoding is required for the CA certificate value stored in the Secret.
Reference:
v1beta1/v1beta2 Example: Cluster with Additional Trusted CA Certificates for SSL/TLS
The objective was:
- Start with the Harbor CA certificate in PEM format.
- Encode the certificate value for Kubernetes Secret usage.
- Create a Secret containing the encoded CA value.
- Reference that Secret and key from the VKS Cluster YAML.
- Deploy or redeploy the workload cluster so the CA trust is applied during node provisioning.
There are three pieces that must line up:
Secret name in the namespace
        ↓
Secret data map key
        ↓
Cluster YAML secretRef name and key
For example, if the Secret is named:
cluster01-user-trusted-ca-secretand the key is:
additional-ca-1then the Cluster YAML must reference the same exact values:
secretRef:
  name: cluster01-user-trusted-ca-secret
  key: additional-ca-1
If the Secret exists but the Cluster YAML references the wrong Secret name or wrong key, the trust configuration will not be applied correctly.
Step 1: Save the Harbor CA Certificate #
Start with the CA certificate in PEM format:
nano harbor-ca.crtPaste the CA certificate:
-----BEGIN CERTIFICATE-----
MIIF...
...
-----END CERTIFICATE-----
Save the file:
Ctrl + O
Enter
Ctrl + X
Verify the certificate file:
cat harbor-ca.crtYou should see the PEM certificate block.
Step 2: Encode the Certificate #
The field guide used a double base64 encoding workflow before placing the value into the Kubernetes Secret. Broadcom’s example calls this out directly because if the contents are not double base64-encoded, the resulting PEM file cannot be processed by the cluster.
On Linux, the encoding command can be run as:
base64 -w 0 harbor-ca.crt | base64 -w 0 > harbor-ca-double-b64.txtThis equivalent command also works:
cat harbor-ca.crt | base64 -w 0 | base64 -w 0 > harbor-ca-double-b64.txtVerify the output:
cat harbor-ca-double-b64.txtYou should see one long base64 string.
If the -w 0 option is not available, use this alternative:
cat harbor-ca.crt | base64 | tr -d '\n' | base64 | tr -d '\n' > harbor-ca-double-b64.txtImportant note:
When using the Secret
data:field, do not manually paste the raw-----BEGIN CERTIFICATE-----block into the Secret. The Secret data field expects an encoded value.
Step 3: Create the Kubernetes Secret YAML #
Create the Secret manifest:
nano cluster01-user-trusted-ca-secret.yamlUse a sanitized structure like this:
apiVersion: v1
kind: Secret
metadata:
  name: cluster01-user-trusted-ca-secret
  namespace: app-platform-namespace
type: Opaque
data:
  additional-ca-1: <PASTE_DOUBLE_BASE64_ENCODED_CA_VALUE_HERE>
For a new cluster, Broadcom’s example uses the naming pattern:
CLUSTER-NAME-user-trusted-ca-secretFor example, if the VKS Cluster object is named cluster01, the Secret name would be:
cluster01-user-trusted-ca-secretThe key name, such as additional-ca-1, is the data map field that the Cluster YAML references later.
Replace the placeholder value with the contents of the encoded certificate file:
cat harbor-ca-double-b64.txtSave the file:
Ctrl + O
Enter
Ctrl + X
Step 4: Apply the Secret #
Apply the Secret:
kubectl apply -f cluster01-user-trusted-ca-secret.yamlVerify that the Secret exists:
kubectl get secret cluster01-user-trusted-ca-secret -n app-platform-namespaceDescribe the Secret to confirm the expected key exists:
kubectl describe secret cluster01-user-trusted-ca-secret -n app-platform-namespaceYou should see the key:
additional-ca-1Step 5: Reference the Secret in the VKS Cluster YAML #
In the Cluster YAML, reference the Secret under the variables section:
variables:
- name: vmClass
  value: guaranteed-medium
- name: storageClass
  value: tkgs-storage-profile
- name: osConfiguration
  value:
    trust:
      additionalTrustedCAs:
      - caCert:
          secretRef:
            name: cluster01-user-trusted-ca-secret
            key: additional-ca-1
This is what allows the VKS workload cluster to consume the additional trusted CA during provisioning.
Notice that the Cluster YAML references the Secret by name and key only. The certificate data itself remains inside the Kubernetes Secret.
The relationship looks like this:
Kubernetes Secret
  metadata.name: cluster01-user-trusted-ca-secret
  data.additional-ca-1: <double-base64-encoded-ca>

Cluster YAML
  osConfiguration.trust.additionalTrustedCAs.caCert.secretRef.name: cluster01-user-trusted-ca-secret
  osConfiguration.trust.additionalTrustedCAs.caCert.secretRef.key: additional-ca-1
This is also why the Secret needs to be created before the Cluster YAML is applied for a new cluster. The cluster provisioning workflow needs the Secret to exist when it evaluates the osConfiguration.trust.additionalTrustedCAs variable.
Step 6: Deploy the VKS Workload Cluster #
Apply the workload cluster manifest:
kubectl apply -f cluster01.yamlWatch the cluster object:
kubectl get cluster -n app-platform-namespace -wWatch the machines:
kubectl get machines -n app-platform-namespace -wCheck the cluster status:
kubectl get cluster -n app-platform-namespaceA useful detail during this phase is the difference between UP-TO-DATE and AVAILABLE.
UP-TO-DATE means the machine matches the current desired cluster specification. It does not necessarily mean the node is ready and usable.
AVAILABLE is the more important readiness indicator because it tells you whether the machine is actually available.

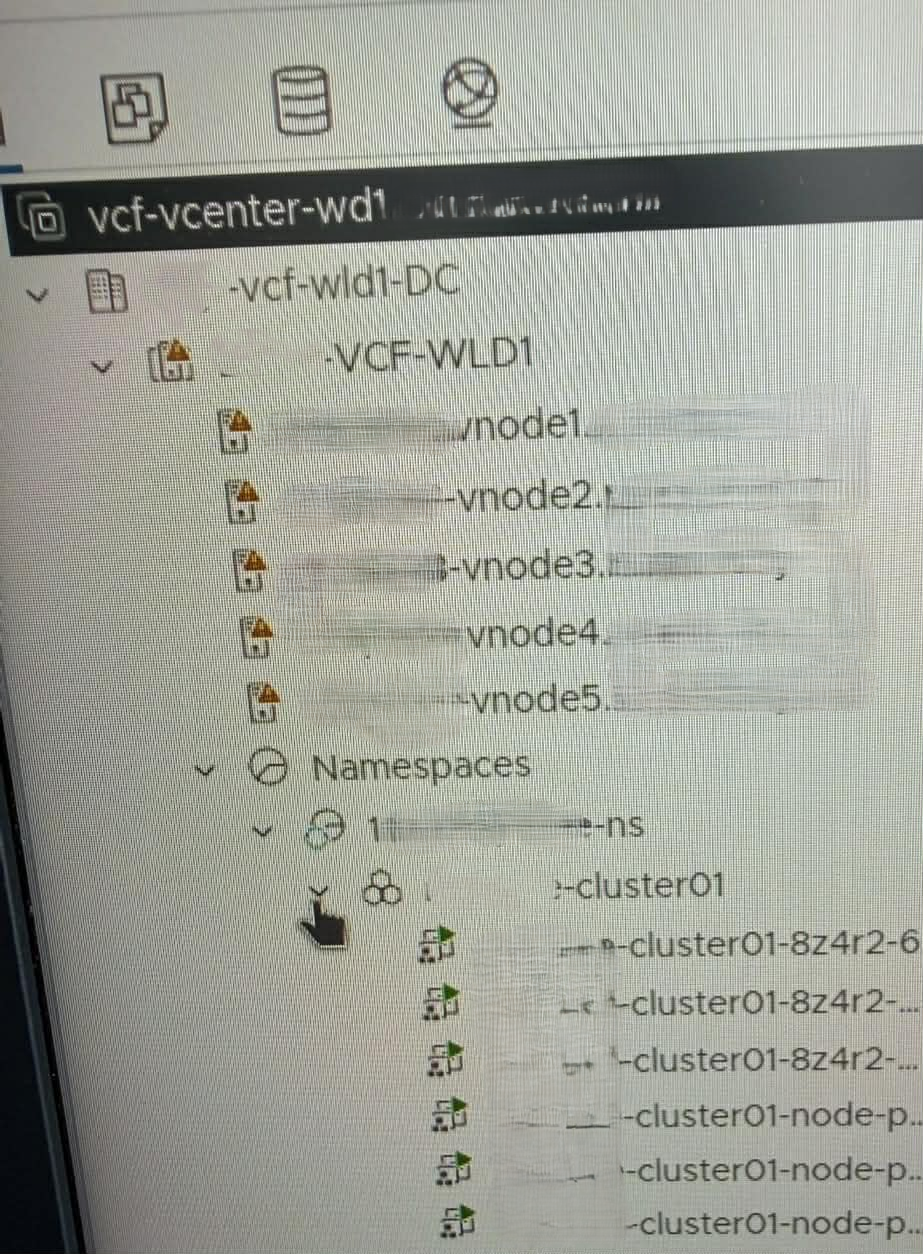
You can also monitor the cluster deployment from your vSphere Client underneath the respective namespace as the cluster components begin to show available in the CLI.
Rebuilding the Workload Cluster to Propagate Trust #
After correcting the trusted CA configuration, the workload cluster was rebuilt and redeployed so the trust configuration would be included during node provisioning.
This mattered because the trust relationship needed to exist on the worker nodes before the container runtime attempted to pull images from Harbor.
The practical sequence was:
Create Harbor CA Secret
        ↓
Reference Secret in Cluster YAML
        ↓
Deploy or rebuild VKS workload cluster
        ↓
Worker nodes receive additional trusted CA configuration
        ↓
Image pulls from Harbor succeed
This is one of the most important takeaways from the entire process.
Creating the Secret alone is not enough. The Cluster YAML must reference it, and the nodes must be provisioned or reconciled with that configuration.
Validating Cluster Contexts and Namespaces #
Before deploying the test workload, we validated the available Kubernetes contexts and confirmed the correct namespace.
List contexts:
kubectl config get-contextsSwitch to the correct context:
kubectl config use-context <context-name>Confirm the current context:
kubectl config current-contextSet the current namespace if needed:
kubectl config set-context --current --namespace=app-platform-namespaceCheck for clusters:
kubectl get cluster -n app-platform-namespaceCheck for pods:
kubectl get pods -n app-platform-namespaceEarly in the process, this returned:
No resources found in app-platform-namespace namespace.That message was not an image pull secret problem. It simply meant that no pods existed in the namespace at that moment.
Once the Deployment was applied, Kubernetes created the pod and the troubleshooting moved from namespace validation into pod status and logs.
Deploying Vaultwarden as the Test Workload #
Once Harbor trust was corrected and the workload cluster was running, we needed a practical workload to validate the full path.
Vaultwarden was selected as the test application. The goal was not to design a production Vaultwarden service. The goal was to prove that VKS could pull an image from the internal Harbor registry, create a pod, start the container, and expose the application through Kubernetes networking.
The working Deployment YAML followed this pattern:
apiVersion: apps/v1
kind: Deployment
metadata:
  name: vaultwarden
  namespace: app-platform-namespace
spec:
  replicas: 1
  selector:
    matchLabels:
      app: vaultwarden
  template:
    metadata:
      labels:
        app: vaultwarden
    spec:
      imagePullSecrets:
      - name: harbor-creds
      containers:
      - name: app-container
        image: harbor.example.local/library/vaultwarden/server:1.36.0
        ports:
        - containerPort: 80
        volumeMounts:
        - name: vaultwarden-data
          mountPath: /data
      volumes:
      - name: vaultwarden-data
        emptyDir: {}
A few parts of this YAML mattered.
Deployment Kind #
kind: DeploymentA Deployment was the correct resource type for this validation because Kubernetes needed to create and manage a pod for the application. If the pod failed or was recreated, the Deployment would continue to enforce the desired state.
Namespace #
namespace: app-platform-namespaceThe workload needed to land in the target namespace used by the VKS workload validation workflow.
Image Pull Secret #
imagePullSecrets:
- name: harbor-creds
This allowed the namespace to authenticate to Harbor if the registry required credentials.
This is separate from the CA trust issue. The trusted CA configuration solved certificate validation. The image pull secret solved registry authentication.
Both can be required.
Image Path #
image: harbor.example.local/library/vaultwarden/server:1.36.0This pointed the workload to the Harbor-hosted Vaultwarden image.
Container Port #
ports:
- containerPort: 80
Vaultwarden listened on port 80 inside the container.
Temporary Data Volume #
volumes:
- name: vaultwarden-data
  emptyDir: {}
This created a temporary /data path for the container. That was acceptable for validation, but it is not a production storage design.
Apply the Deployment:
kubectl apply -f vaultwarden.yamlCheck the Deployment:
kubectl get deployment -n app-platform-namespaceCheck the pods:
kubectl get pods -n app-platform-namespaceUse wide output to see the pod IP and node placement:
kubectl get pods -o wide -n app-platform-namespaceA successful result looks like this conceptually:
NAME                          READY   STATUS    RESTARTS   AGE   IP            NODE
vaultwarden-xxxxxxxxxx-xxxxx   1/1     Running   0          2m    10.x.x.x      worker-node-name
Checking Logs to Confirm the Application Started #
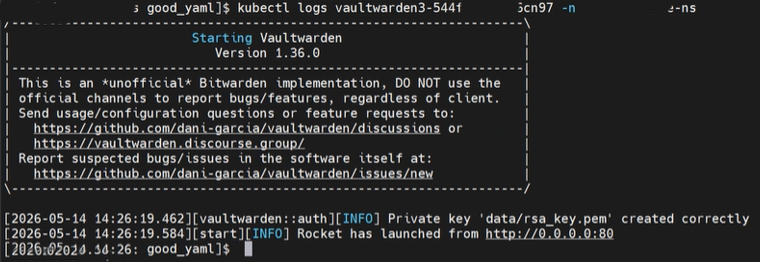
After the pod reached Running, we checked the logs:
kubectl logs <vaultwarden-pod-name> -n app-platform-namespaceThe important lines showed that Vaultwarden started successfully and was listening on port 80:
Starting Vaultwarden
Version 1.36.0
Private key 'data/rsa_key.pem' created correctly
Rocket has launched from http://0.0.0.0:80
At that point, the image pull path, container startup, and application runtime were validated.
The earlier x509 error was gone, which confirmed that the Harbor CA trust configuration had been applied successfully to the workload cluster nodes.
Exposing the Application with a Kubernetes Service #
A running pod is not the final access model.
The Deployment creates and manages the pod, but a Kubernetes Service is what gives the application a stable network endpoint.
For the validation, a Service was created and applied to expose Vaultwarden.
A sanitized Service YAML example looks like this:
apiVersion: v1
kind: Service
metadata:
name: vaultwarden-service
namespace: app-platform-namespace
spec:
selector:
app: vaultwarden
ports:
- protocol: TCP
port: 80
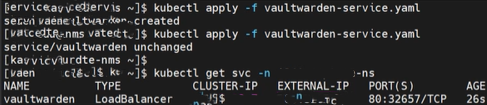
targetPort: 80Apply the Service:
kubectl apply -f vaultwarden-service.yamlCheck the Service:
kubectl get svc -n app-platform-namespaceDescribe the Service:
kubectl describe svc vaultwarden-service -n app-platform-namespaceCheck endpoints:
kubectl get endpoints -n app-platform-namespaceThe Service selector must match the pod label.
In the Deployment:
labels:
  app: vaultwarden
In the Service:
selector:
  app: vaultwarden
If those do not match, the Service will exist but will not send traffic to the pod.
Because the Supervisor and VKS environment had already been designed around VPC networking and external IP block consumption, the application could be reached through the expected external service endpoint.
This was the point where the earlier Supervisor networking design paid off. The workload was not just running internally. It was reachable through the platform network path that had been planned during the Supervisor and VPC networking phase.
Storage Considerations: emptyDir Is Not a Production Design #
The working test deployment used emptyDir:
volumes:
- name: vaultwarden-data
  emptyDir: {}
That was fine for proving the workload path, but it is not appropriate for a production-like deployment of an application that stores data.
emptyDir exists only for the lifetime of the pod. If the pod is deleted, recreated, or rescheduled, the data is lost.
For Vaultwarden, the /data path matters because it stores application data such as the database and generated keys.
A better long-term model would be to use a PersistentVolumeClaim:
apiVersion: v1
kind: PersistentVolumeClaim
metadata:
  name: vaultwarden-data-pvc
  namespace: app-platform-namespace
spec:
  accessModes:
  - ReadWriteOnce
  resources:
    requests:
      storage: 5Gi
Then reference the PVC in the Deployment:
volumes:
- name: vaultwarden-data
  persistentVolumeClaim:
    claimName: vaultwarden-data-pvc
For this validation, the main objective was not persistent application data. The objective was to validate the registry, trust, image pull, pod runtime, and service exposure workflow.
Still, storage should be addressed before treating this as anything beyond a functional test.
Troubleshooting Commands Used During Validation #
The following commands were useful throughout the process.
Context and Namespace Validation #
kubectl config get-contexts
kubectl config current-context
kubectl config use-context <context-name>
kubectl config set-context --current --namespace=app-platform-namespace
Cluster and Machine Validation #
kubectl get cluster -n app-platform-namespace
kubectl get cluster -n app-platform-namespace -w
kubectl describe cluster <cluster-name> -n app-platform-namespace
kubectl get machines -n app-platform-namespace
kubectl get machines -n app-platform-namespace -w
Secret Validation #
kubectl get secret cluster01-user-trusted-ca-secret -n app-platform-namespace
kubectl describe secret cluster01-user-trusted-ca-secret -n app-platform-namespace
kubectl get secret cluster01-user-trusted-ca-secret -n app-platform-namespace -o yaml
Deployment Validation #
kubectl apply -f vaultwarden.yaml
kubectl get deployment -n app-platform-namespace
kubectl describe deployment vaultwarden -n app-platform-namespace
Pod Validation #
kubectl get pods -n app-platform-namespace
kubectl get pods -o wide -n app-platform-namespace
kubectl describe pod <pod-name> -n app-platform-namespace
kubectl logs <pod-name> -n app-platform-namespace
Service Validation #
kubectl apply -f vaultwarden-service.yaml
kubectl get svc -n app-platform-namespace
kubectl describe svc vaultwarden-service -n app-platform-namespace
kubectl get endpoints -n app-platform-namespace
Event Review #
kubectl get events -n app-platform-namespace --sort-by=.lastTimestampEvents are especially useful when troubleshooting image pull issues, scheduling issues, or Service exposure problems.
Common Mistakes and Lessons Learned #
Mistake 1: Assuming Harbor Trust on the VM Is Enough #
The Harbor VM can have a valid signed certificate, but the VKS worker nodes still need to trust the signing CA.
If the node does not trust the CA, the image pull fails with:
x509: certificate signed by unknown authorityMistake 2: Confusing Older TKC YAML with Newer Cluster API YAML #
Older examples may reference:
settings:
  network:
    trust:
The newer Cluster API model used in this workflow referenced the trusted CA Secret under:
variables:
- name: osConfiguration
  value:
    trust:
      additionalTrustedCAs:
Mistake 3: Creating the Secret but Not Referencing It #
Creating the Secret alone does not automatically inject trust into the workload cluster nodes.
The Cluster YAML must reference the Secret and key.
Mistake 4: Expecting Existing Nodes to Immediately Trust the CA #
The workload cluster had to be rebuilt or redeployed so the CA trust was applied during node provisioning.
Mistake 5: Treating No resources found as an Image Pull Secret Issue
#
No resources found means Kubernetes did not find resources of that type in the namespace at that time. It does not indicate an image pull secret issue by itself.
Mistake 6: Forgetting the Service #
A pod can be Running and still not be reachable externally. The Service is what gives the application a stable access path.
Mistake 7: Treating emptyDir as Persistent Storage
#
emptyDir works for testing, but it is not persistent. Use a PVC for anything that needs to retain data.
Final Validated Outcome #
By the end of this workflow, the environment had validated the following:
- VKS workload cluster provisioning
- Namespace functionality for the target VKS workload validation namespace
- Harbor image pulls from an internal air-gapped registry
- Additional trusted CA configuration through a Kubernetes Secret reference
- Resolution of
x509certificate trust failures - Vaultwarden pod deployment
- Container startup and application runtime
- Kubernetes Service exposure
- External application reachability through the designed network path
The final result was that the VKS environment could successfully deploy workloads from the Harbor registry, and applications were accessible externally through Kubernetes services.
That is the major milestone.
At that point, the platform had moved beyond simply having a running Supervisor. It had demonstrated end-to-end workload functionality in an air-gapped VCF 9 environment.
What Comes Next #
Once the platform can pull images from Harbor and expose workloads successfully, the next logical areas of focus are:
- CAC login integration
- Automated Kubernetes deployments
- Additional application workflow validation
- Persistent storage integration using PVCs
- Ingress and TLS design
- GitOps or pipeline-driven deployment models
- Production hardening of Harbor and workload registry access
- Lifecycle planning for VKS clusters and Supervisor Services
The important part is that the foundation is now proven.
The Supervisor is running. VPC networking is in place. Harbor is available in the air-gapped environment. The workload cluster trusts the internal registry. The application can be pulled, deployed, started, exposed, and reached.
That is what turns the platform from an enabled feature into a usable Kubernetes consumption model.
Final Thoughts #
Deploying a Supervisor is an important milestone, but it is not the end state.
The real value comes when the platform can support actual workload consumption. In an air-gapped VCF 9 environment, that means solving the private registry problem, certificate trust, workload cluster configuration, namespace alignment, and service exposure.
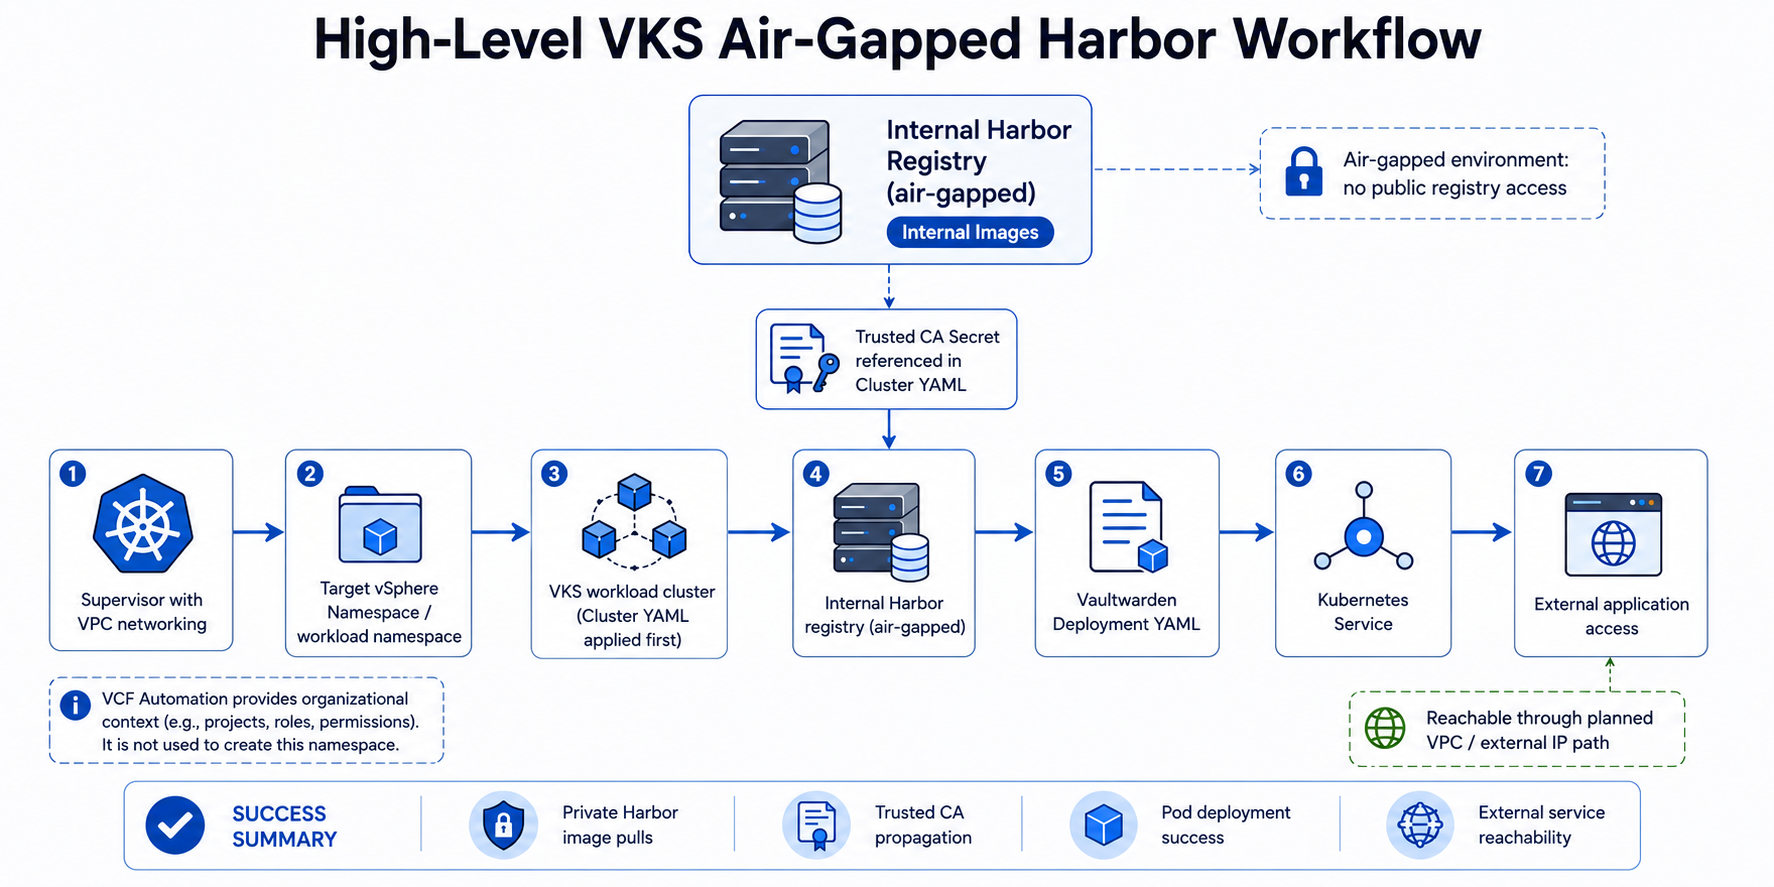
This workflow proved the full path:
Supervisor with VPC networking
        ↓
Target vSphere Namespace for VKS cluster provisioning
        ↓
VKS workload cluster
        ↓
Internal Harbor registry
        ↓
Additional trusted CA configuration
        ↓
Vaultwarden Deployment
        ↓
Kubernetes Service
        ↓
External application access
That is the difference between enabling Kubernetes and operationalizing Kubernetes.
A running Supervisor gives you the platform foundation.
A working VKS deployment from an internal Harbor registry proves the platform can actually be consumed.
References #
Deploying a Supervisor in VCF 9: What Actually Matters
Deploying Harbor Service in Air-Gapped VMware Cloud Foundation 9.0
Accessing Bitnami Harbor OVA for Air-Gapped vSphere Supervisor Deployment
Workflow for Provisioning VKS Clusters Using kubectl
v1beta1/v1beta2 Example: Default Cluster
v1beta1/v1beta2 Example: Cluster with Additional Trusted CA Certificates for SSL/TLS